Add Row
Add Element
June 20.2025
3 Minutes Read

Transform Your Kitchen with a Unique DIY Island Featuring Seating

Build a kitchen island with seating in a modern kitchen

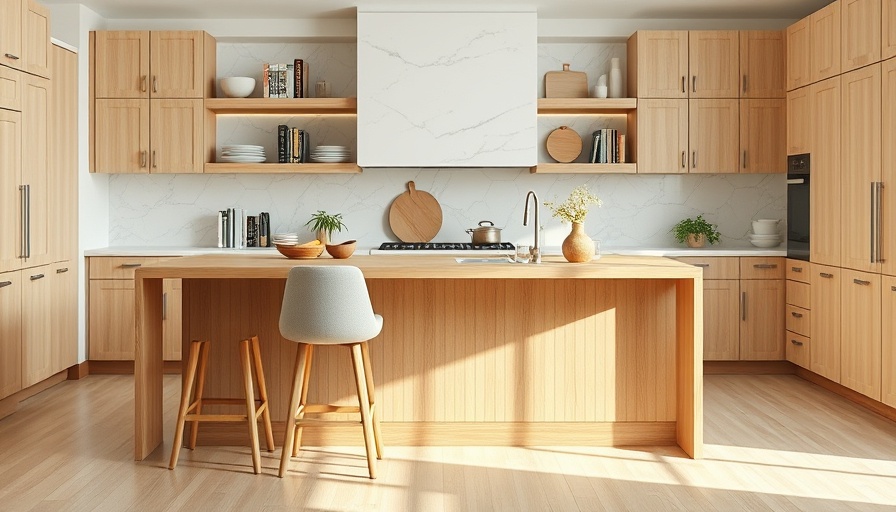
Transform Your Space: Building a Unique Kitchen Island

Have you ever dreamed of crafting a kitchen island that combines both style and functionality in your home? Building a kitchen island with seating is not only an excellent way to enhance your cooking and entertaining space, but it can also serve as a fun DIY project. In this guide, we will walk you through the essential steps to create a stunning island using IKEA cabinets, highlighting how you can achieve a custom look while sticking to an approachable budget of $1500 to $2000.

Gather Your Tools and Materials

Before starting your DIY journey, it’s crucial to gather all the necessary tools and materials. For this project, you’ll need tools such as a drill/driver, jigsaw, and clamps among others, as well as IKEA Sektion cabinets to form the base of your island. With the right tools and materials, you’ll set a strong foundation for a successful build.

Getting Creative with Design

The first step in crafting your kitchen island is to conceptualize your design. Though IKEA cabinets provide a functional starting point, you can make them unique with paint and finishes that coordinate with your kitchen aesthetics. Consider choosing a color that complements your existing cabinetry or a bold hue that makes a statement. Don’t hesitate to play around with different layouts and styles—this is your chance to let your creativity shine!

Step-by-Step Assembly

Start by assembling the IKEA cabinets according to the provided instructions. Use wood glue and precise measurements to ensure everything is level and secure, creating a sturdy structure. If you are unsure about any assembly steps, the online IKEA assembly instructions can be a valuable resource. Once assembled, you can focus on pre-painting the MDF panels, which will save you time during the finishing touches. This preparatory work helps streamline the process, ensuring a smoother workflow.

Enhancing Functionality with Seating

One of the standout features of your new kitchen island will be the seating area. To do this, ensure that the island is designed with ample overhang for comfortable bar stools or chairs. Think about how your kitchen functions—if it’s often a gathering spot, additional seating can enhance the space, making it both practical and inviting.

Budget-Friendly Solutions

Building your custom kitchen island doesn’t have to break the bank. By opting for IKEA as a starting point, you can save on cabinetry costs without compromising on quality. Additionally, many tools and materials can often be borrowed or rented, reducing overall expenditure. Remember, this project is great for honing your DIY skills and ensuring you get exactly what you want in your kitchen.

Final Touches and Personalization

Once the island is assembled and painted, focus on the finishing touches. Adding decorative elements such as open shelving can enhance functionality and allow for personal expression through decor. Consider displaying cookbooks, plants, or unique kitchen ware to make the island feel like a natural extension of your home.

Inspiration for Future Projects

As you complete your kitchen island, take a moment to reflect on other DIY projects you could tackle around your home. Whether it’s a new countertop or a refresh of your kitchen cabinets, the skills gained from this project are transferable. With every new challenge, you'll not only elevate your home but also grow in confidence.

So, gather your tools, unleash your creativity, and transform your kitchen into the heart of your home with a beautiful self-built island. Happy DIY-ing!

Home Now and Future

0 Views

0 Comments

Write A Comment

*
*
Related Posts All Posts
06.21.2025

Master the Art of DIY: Install Ikea Kitchen Cabinets Like A Pro

Update Transform Your Kitchen: A Guide to Installing Ikea CabinetsRenovating a kitchen can seem like a daunting task, but with Ikea's innovative design, you can achieve a professional finish without breaking the bank. Whether you're looking to save money or just love the idea of taking on a DIY project, learning how to install Ikea kitchen cabinets means you can enjoy a stunning change with your own hands.Why Choose Ikea Cabinets for Your DIY Project?Ikea cabinets are designed with the DIY enthusiast in mind. The incorporation of a suspension rail system simplifies installation, allowing for easier adjustments and placements compared to traditional cabinet systems. This unique feature not only saves time but also reduces potential frustrations during the process. With the right planning and tools, you’ll be able to create a beautiful, functional kitchen space that reflects your personal style.Planning is Key: Layout and PreparationBefore you begin the installation, taking some time to plan your cabinet layout will be invaluable. Consider the kitchen appliances, floating shelves, or other elements that will influence where your cabinets go. Make sure to account for enough room around appliances to avoid cramping your workflow. Proper planning is the difference between a seamless installation and constant adjustments. Sketch your kitchen with measurements to visualize your layout; you'll thank yourself later!Essential Tools You’ll NeedTo ensure your installation goes as smoothly as possible, gather the necessary tools ahead of time. Essential tools include a level, drill, clamps, a miter saw, and various screwdrivers. Having everything ready not only saves time but makes the installation process more organized and efficient. For further assistance, consider visiting an online DIY community for insights and tips from others who have completed similar projects.A Step-by-Step Guide to InstallationThe core of your project will involve several key steps: removing old cabinets, checking for level floors, and securely mounting your new cabinets. Begin by carefully detaching any existing cabinets, ensuring to remove all items beforehand. Once the space is cleared, check for the highest point on your floor—this will serve as your guide for leveling your cabinets. Remember, the goal is to have all your cabinets sit flush against the wall and be evenly aligned.Next, draw a level line along the walls where the base cabinets will be installed. This will not only help in determining the correct placement but will also ensure structural alignment as you proceed with hanging the units. Finally, affix the cabinets to the wall and to one another, securing them into place using screws. Be sure to double-check your level as you work to avoid any misalignment.The Joy of DIY and Its Lasting ImpactCompleting a kitchen cabinet installation is not just about the tangible results; it's also about the personal finish you add as a DIYer. The satisfaction that comes with transforming your eating space can enhance your appreciation for home cooking and hospitality. More than just a renovation, it's an investment in your lifestyle and a space that fosters community and meals enjoyed together.Final ThoughtsWith careful planning, the right tools, and a bit of effort, installing Ikea kitchen cabinets can be a rewarding endeavor. Embrace the DIY spirit, and remember that you’re creating a space that can bring joy to your home and provide lasting value. For more tips and ideas, connect with fellow DIYers and explore resources that offer further guidance. Ready to make your kitchen dreams a reality? Dive into your project and enjoy the process!

06.21.2025

Essential Items You'll Need for Your New Home: A Complete Guide

Update Essential Items for Your New Home: Start Off Right Moving into a new home is an exhilarating milestone, filled with the promise of fresh beginnings. However, it can quickly turn overwhelming without the right preparations. Based on insights from various real estate experts, here’s a detailed guide on the key essentials that will ensure a smooth transition and comfort in your new space. Get the Basics Right: Furniture Matters The first and perhaps most obvious essential is furniture. Many new homeowners unintentionally overlook the necessity of basic seating and dining options. As one real estate agent observed, having no furniture can lead to uncomfortable days spent on the floor or a fireplace. Before moving day, assess what you have – whether it's pieces from your previous residence or new purchases – and make sure some seating is ready for the first night in your new home. Consider items like folding chairs and a small table if your budget is tight. Why You Need a Reliable Tool Kit A tool kit may seem like an afterthought, but it can be invaluable in those first chaotic days. Essential tools like a screwdriver set, a hammer, and a level will serve you well as you set up your new space. Real estate expert Fred Loguidice recommends having a variety of items, including a manual screwdriver set and a drill. All these tools will allow for quick fixes and adjustments, ensuring that your new home feels just right from the start. Cleaning Supplies: The Key to a Fresh Start Cleaning is an integral part of moving into any new space. Before you unpack, a thorough clean can make a world of difference. Basic supplies like all-purpose cleaners, bathroom cleaners, and a vacuum are must-haves. Don’t forget those smaller items, like window cleaners, which can boost the overall vibe! A decluttered home promotes peace of mind and sets a positive tone for new experiences. A Trash Can and Trash Bags Are Vital It may seem trivial, but having trash cans and bags ready before you move in can streamline the process and keep your new home organized from Day One. Coordinate with local waste services to ensure trash pickup is set up, but also consider where waste and recycling will go inside your home. Having dedicated bins in key areas will prevent any unnecessary clutter or mess during your initial move-in phase. Connections Matter: Setting Up Utilities Don’t forget about basic utilities! Getting your utilities set up well in advance of your move can alleviate stress. Ensuring electricity, water, internet, and gas are functional before you walk through that front door means seamless living as you settle in. It’s best to contact utility companies to establish services ahead of time, ensuring you won’t face any cold showers or dark evenings. Making Room for What Matters: Emotional Preparedness Finally, remember that moving homes isn’t just a physical task; it’s emotional. Take the time to acknowledge the transition—perhaps by hosting a small get-together with friends or family once settled. Sharing experiences can create a comforting environment, easing the emotional load of such a significant change. As you prepare to enjoy this exciting chapter, keeping these essentials in mind will help you create a home that welcomes you each day. Ultimately, the joy of a new home is not just within the walls you live in, but also in the lifestyle that you foster within them.

06.21.2025

Stop That Drip: A Simple Guide to Fixing Your Leaky Kitchen Faucet

Update Fix That Drip: Your Wallet Will Thank You Nothing is more frustrating than a persistent drip coming from your kitchen faucet. Noisy, disruptive, and a sneaky source of wasted water, a leaky faucet can lead to higher water bills and environmental concerns. Fortunately, you don’t need to be a plumbing expert to tackle this problem. By following some straightforward steps, you can fix that annoying drip and save yourself some cash on plumber fees. Identifying the Culprit Why is your faucet leaking? In most cases, it’s due to worn-out components such as rubber O-rings, washers, or cartridges that manage the water flow. Over time, these essential parts degrade, leading to leaks. Knowing the type of faucet you have is crucial in determining which replacement parts you need. Whether it’s a single-lever or a double-handle faucet, the principles of fixing the problem remain largely the same. Essential Tools for Your DIY Repair Before diving into the fix, gather a few basic tools. An adjustable wrench, Allen wrenches, flathead and Phillips screwdrivers, and needle-nose pliers are all you need. Also, consider having a plumber's socket set with a bar handle on standby. If you’re planning to clean around any mineral deposits, some vinegar can work wonders. These items may seem simple, yet they are your best friends in tackling faucet repairs. Step-by-Step Guide to Stop the Drip Let’s break it down into manageable steps: Turn Off the Water: Find the shut-off valves under your sink and turn them off. If there aren’t any, you’ll need to turn off the water supply at the main valve. Remove Faucet Handle: Use your tools to remove caps and screws covering the faucet handle. Pull the handle off gently. Inspect the Components: Once the handle is off, inspect the O-rings and cartridges. It’s often these parts that need replacing. Replace Worn Parts: Order the parts specific to your faucet model and replace them accordingly. Test for Leaks: Reassemble your faucet and turn the water back on. Test it to ensure the drip has stopped. Simple, right? Tackling this task not only gives you the satisfaction of DIY but also contributes towards reducing your water bill. Beyond Just Fixing: Embracing Sustainable Living Fixing a leaky faucet goes beyond saving a few bucks; it plays a crucial role in cultivating a more sustainable lifestyle. By addressing these small issues on your own, you contribute positively to the environment by conserving water and reducing wastage. Every drop saved is a step towards a healthier planet, which aligns with the growing trend of eco-friendly living. Final Thoughts: Empower Yourself Taking the initiative to fix simple home repairs is empowering. Not only will you gain confidence in your DIY skills, but you’ll also be on the right track to maintaining an environmentally-conscious household. Start with your kitchen faucet, and soon, you’ll find yourself taking on even bigger projects. Remember, every effort counts!

Add Row
Add Element
cropper
update
New Wave Rocket
cropper
update

Ideas, Insights and Leading Edge Comapnies for 2025.

  • update
  • update
  • update
  • update
  • update
  • update
  • update
Add Element

Electric Store Front

  • Home
  • Categories
    • Tech Horizons
    • Marketing Evolution
    • Energy Alignment
    • Growth Mindset
    • 2025 Playbook
    • Future-Ready Business
    • Wellness Amplified:
    • Home Advantage
    • Home Now and Future
    • Companies to Watch
    • Emerging Trends
Add Element

610 740 4605

City, State

7417 Donna Drive #1

New Tripoli, PA 18066
[610] 740-4605
Add Element

ABOUT US

Ideas, insights and inspiration to act in the new web for 2025 and beyond.

Add Element

© 2025 CompanyName All Rights Reserved. Address . Contact Us . Terms of Service . Privacy Policy

Terms of Service

Privacy Policy

Core Modal Title

Sorry, no results found

You Might Find These Articles Interesting

T
Please Check Your Email
We Will Be Following Up Shortly
*
*
*