cropper
update
AI Ranking by AIWebForce.com
cropper
update
  • Home
  • Categories
    • Marketing Evolution
    • Future-Ready Business
    • Tech Horizons
    • Growth Mindset
    • 2025 Playbook
    • Wellness Amplified
    • Companies to Watch
    • Getting Started With AI Content Marketing
    • Leading Edge AI
    • Roofing Contractors
    • Making a Difference
    • Chiropractor
    • AIWebForce RSS
  • AI Training & Services
    • Three Strategies for Using AI
    • Get Your Site Featured
April 29.2025
3 Minutes Read

Essential Guide to Choosing the Right Car Jack for Your Vehicle

Choosing the Right Car Jack: Red hydraulic jack lifting a car outdoors.

Understanding Car Jacks: The Essentials

When it comes to vehicle maintenance and roadside repairs, the importance of using the correct car jack cannot be overstated. From personal experience, I recall the first time I attempted to lift my high-top van to rotate the tires; the scissor jack that came with it buckled under pressure, offering a terrifying glimpse into the dangers of improper equipment. Safety should always be the foremost concern, whether you're a novice DIYer or a seasoned mechanic. In this guide, we'll explore the different types of car jacks, their uses, and what to consider before making a purchase.

Scissor Jack: The Basic Tool

The scissor jack is the most common option, usually found in the trunk of vehicles. Typically priced between $25-$80, it serves a straightforward function: changing a flat tire. Designed for quick use, it is compact, lightweight, and easily storable. However, while they are convenient, safety experts caution that scissor jacks should not be relied upon for long-term support; they are essentially meant for tire changes only.

Pros: Compact, inexpensive, easily accessible.
Cons: Limited height range, instability, and weight capacity. Always use jack stands for extra support!

Exploring Bottle Jacks: For Heavy Lifting

If your vehicle has higher clearance or needs to lift heavier loads, a bottle jack is worth considering. Ranging from $20-$100, these hydraulic jacks can lift substantial weight, making them suitable for various maintenance tasks. However, they require a solid base to prevent potential accidents since their smaller frames can sink into soft ground, making an emergency kit item, like plywood, essential.

Pros: High weight capacity relative to size, compact design.
Cons: Requires stable and level ground, potential instability if improperly positioned.

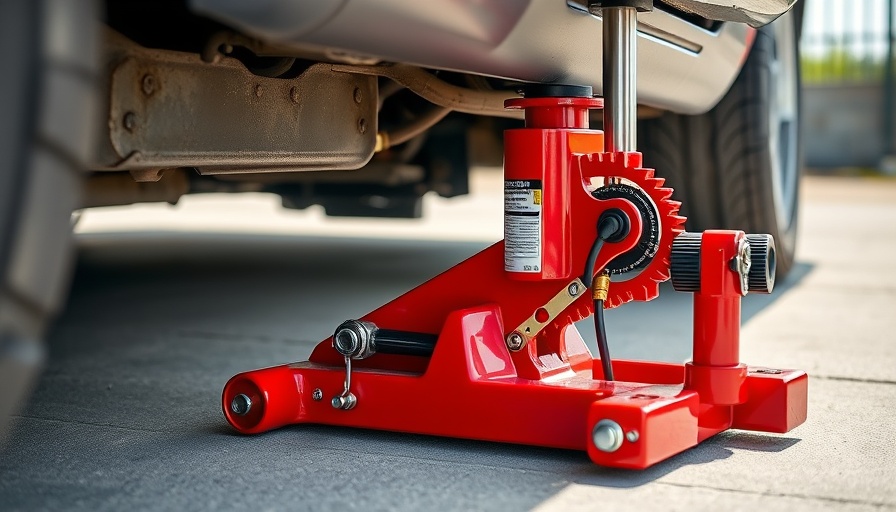
Hydraulic Floor Jacks: The DIY Favorite

For the home mechanic who frequently engages in repairs, hydraulic floor jacks ($50-$500) are often the best choice. Unlike the scissor and bottle jacks, floor jacks offer a broader base and can accommodate various heights, allowing mechanics to safely lift their vehicles and work underneath. They represent a significant upgrade in convenience and stability, which can be vital during more complex repair jobs.

Safety First: Essential Tips for Using Car Jacks

Regardless of the type of jack you choose, certain safety practices should always be adhered to:

  • Always use jack stands: Never work under a vehicle that is solely supported by a jack.
  • Inspect your jack regularly: Before use, ensure it’s in good working condition.
  • Choose a stable location: Ensure you're on solid ground before lifting.
  • Familiarize yourself with the jack's operation: Each jack can function differently; read the manual!
These simple steps can dramatically increase your safety while working on your vehicle.

Final Thoughts: Making the Right Choice

Choosing the right car jack depends on both your specific vehicle needs and your level of DIY experience. Prioritize safety and always keep a lookout for evolving trends in jack technology as well. Whether a scissor jack for quick fixes or a hydraulic floor jack for in-depth repairs, having the right tools on hand can enhance your automotive repair experience.

Home Now and Future

0 Comments

Write A Comment

*
*
Please complete the captcha to submit your comment.
Related Posts All Posts
06.13.2026

Uncover the Simple Loan Payment Trick to Save Thousands in Interest

Update The Surprising Benefits of Weekly Loan PaymentsIn a world where financial burdens seem to grow heavier, the prospect of easing monthly expenses significantly resonates with many homeowners. Many are on the lookout for clever strategies to alleviate their financial obligations, particularly regarding their largest monthly expenditure: mortgage payments. Interestingly, one such strategy—making weekly payments instead of the traditional monthly ones—has caught the attention of savvy homeowners and financial advisors alike.Weekly mortgage payments, while not commonly discussed, can remarkably change your financial landscape. By crafting a strategy around weekly payments, homeowners may benefit from paying down their principal more quickly, resulting in substantial long-term interest savings. This approach works on the principle that smaller, more frequent payments reduce the total interest paid on loans over time. If a borrower continues with this method over the life of a mortgage, which spans several years, the financial impact could be profound.Why Choose Weekly Payments?Research reveals that homeowners committed to weekly payments can effectively make the equivalent of one extra monthly payment each year—meaning, instead of twelve total payments, they actually complete thirteen. This approach can substantially decrease the loan term and lessen the interest paid over time. Adam Saab from loanDepot highlights that “making payments weekly equates to 1 extra monthly payment, resulting in 13 vs. 12 payments in a year.”By contributing a bit more frequently, you manage to chip away not only at your principal but also at the interest calculated on that decreasing balance. It’s an effective way to create momentum in your mortgage repayment strategy!Understanding Your Lender's RoleHowever, it’s essential to note that this method only works if your mortgage servicer permits it and correctly applies the extra payments to your principal. Some servicers may not have the technological capability to administer weekly payments efficiently. Consequently, your extra funds might sit idle in a suspense account rather than actively reducing your debt. Therefore, homeowners are advised to contact their lenders to clarify a few critical points before making any changes to their payment schedules: Is there a technology to accept weekly payments? Will extra payments directly contribute to reducing the principal, rather than prepaid interest? Additionally, inquire about potential fees associated with this payment method.Evaluating the Pros and ConsComparatively, the option of biweekly payments is also popular among homeowners—another method that can accelerate mortgage payoff times and interest savings. Biweekly payments split your monthly payment in half, made every two weeks, resulting in a total of 26 half payments per year or 13 full monthly payments. While both weekly and biweekly options have their benefits, the crucial takeaway remains the same: any extra funds directed towards principal repayment can generate significant savings over time, depending on your financial situation.Practical Steps to Implement Weekly PaymentsIf you're considering switching to a weekly payment plan, implementing your new strategy could be simpler than it seems. Start by calculating your approximate weekly payment to budget accordingly. Next, verify with your lender that they can process these payments efficiently. If a lender does not accept weekly payments, explore the option of making larger contributions or additional monthly payments to mitigate overall interest expenses. There are various online calculators available that allow homeowners to estimate how much they can save over the life of their loans by using these techniques. Who doesn’t want to save money?Taking Control of Your Financial FutureUltimately, understanding your loan details and being proactive about making monthly commitments can be an empowering step toward financial independence. Homeowners who embrace alternatives to standard payment schedules may find that small changes lead to lasting benefits.In this landscape of fluctuating interest rates and rising living costs, exploring options to streamline your mortgage payment strategy is not just smart, it's essential. Don’t let traditional norms define your financial choices—research, ask, and discover what strategies can work best for you!

06.13.2026

Create Your Own Guitar Wall Hanger: A Fun DIY from Offcuts

Update Transform Your Space: The Ultimate DIY Guitar Wall Hanger For many music lovers, a guitar is more than just an instrument; it’s a cherished companion. However, too often, our favorite guitars languish in their cases, hidden away and forgotten. This simple journey from a neglected instrument to a proudly displayed piece of art can be achieved with ease—thanks to a DIY guitar wall hanger! This project not only breathes life into your beloved strings but also encourages you to pick them up and play more often. Unlock the Hidden Potential of Wood Scraps One of the biggest advantages of embarking on a DIY guitar wall hanger is utilizing wood scraps that may otherwise go to waste. This approach is both sustainable and cost-effective. According to Family Handyman, building a guitar hook from offcuts can range in cost from $10 to $60, depending on the materials at hand. Imagine transforming leftover pieces from previous woodworking endeavors into a functional artwork that pays homage to your musical passions! Easy Steps for Beginners For those just embarking on their DIY journey, constructing this guitar holder is a beginner-friendly project that promises satisfaction. You’ll need basic tools like a drill, miter saw, and some clamps. The process starts with cutting your preferred wood into several manageable pieces and then gluing them together. As you create your guitar hook, your confidence and skills will grow as you navigate each step. This hands-on experience offers an undeniable sense of accomplishment. Connecting Music and Family This DIY project goes beyond carpentry—it fosters family connection. As highlighted in the Lemon Thistle write-up on DIY wall holders, creating a display for instruments makes it easier for family members to engage with music. When guitars are accessible on your wall, everyone feels encouraged to play, leading to spontaneous jam sessions and cherishing moments. Turning music into a shared family experience not only strengthens bonds but also creates lasting memories. Crafting with Care: Additional Recommendations When crafting your own guitar wall hanger, consider adding personalized touches. Stains and finishes can give your project a unique flair that reflects your style. For example, choosing a dark wood stain can create a more modern aesthetic, while a natural finish can emphasize the wood's beauty. Incorporate vintage-looking brackets or hooks for a rustic vibe. The possibilities are endless—let your creativity run wild! Why This DIY Wall Hanger Matters Creating a guitar wall hanger isn’t just about freeing up closet space; it serves as a reminder to make music a more prominent part of your life. With instruments displayed artfully on the wall, they become more than just belongings—they transform into inspiring decor that beckons you to play. Consider the impact of music on mental well-being—it is healing and uplifting. This project is a step toward integrating joy and art into daily life. Final Thoughts: Make Music a Priority When you build a durable and beautiful guitar wall hanger from leftover materials, not only do you enjoy the fruits of your handiwork, but you also revitalize your relationship with music. Take a moment to gather those scraps lying around and start this rewarding project today! Not only will your guitar be within reach, but you’ll create a warm and inviting atmosphere in your home. Why not take action now and bring music into focus?

06.13.2026

Transforming Your Shed Into a Dream Workspace: A Journey to Inspiration

Update The Shed That Became a Sanctuary In today's fast-paced world, especially for those embracing remote work, separating home life from work life is more crucial than ever. An old utility shed can transform into a dream workspace, proving that sometimes, it just takes vision and resolve. Inspiration Strikes: A Vision Materializes Scott McDermott's journey began with a casual walk with his architect friend, Dan Michels. As they encountered a dilapidated shed from the 1940s, Dan immediately saw the potential within its crumbling walls. “We came to the old dilapidated shed, which was built in the 1940s,” said McDermott, who elaborated that even though he has a passion for gardening, Michels was the one who could envision the structure's transformation. This kind of inspiration is critical for DIYers; sometimes, a fresh set of eyes can spark innovation. Planning: The Blueprint for Success For McDermott, the project started with meticulous planning. Inspired by various sources—from magazines to social media—he developed idea boards to cultivate his vision of a minimalist workspace free from distractions. “A quiet space where I can sit down for hours at a time and focus on work,” he desired, a testament that thoughtful planning leads to effective execution. Step-by-Step Transformation: The Journey Unfolds The transformation journey took the better part of a year. McDermott first worked on creating a solid framework with the guidance of Michels and others. From insulation and roofing work to installing skylights and comfy new flooring, every step was well-considered. “I was chipping away at it whenever I had time to spare,” McDermott said. The use of sustainable materials also highlighted his resourcefulness, reflecting wider trends in eco-friendly home improvements. Overcoming Challenges: The Reality of Renovation As with any old structure, challenges arose; nothing was square, many components had to be custom-cut, and outdated building codes posed potential roadblocks. McDermott's resourcefulness shone through as he navigated these obstacles, even hiring an electrician to ensure safety and compliance. Such adaptability is essential for any aspiring DIYer—there will always be unexpected hurdles to hop over. Sharing Wisdom: Advice for Future DIYers Reflecting on his journey, McDermott advised future DIYers to “take it slow and do it right.” Patience and thoroughness not only lead to more satisfactorily completed projects but also provide a sense of pride once you see your hard work come to fruition. Utilizing resources such as YouTube tutorials or asking experienced individuals out in the field can broaden your toolkit, giving you more confidence in your renovations. The Profound Shifts: Beyond Physical Spaces One of the most rewarding aspects of McDermott's project was not simply the physical outcome, but the mental shift it prompted. Creating a dedicated workspace offers a clear division between home and work—a key factor for mental well-being for remote workers. “Knowing that I had built it all myself was all the more rewarding,” he expressed. Likewise, another DIYer, Marisa Todaro-Roman, noted similar sentiments after transforming her shed into a functional home office for $2,500, emphasizing how it provided a better balance and a productivity boost. In an era where remote work is prevalent, such transformations are not just about home improvement; they also speak to our ongoing search for comfort, efficiency, and well-being in the places we inhabit. If you're contemplating a project yourself, take McDermott's journey as encouragement: with creativity, determination, and a clear plan, almost any space can become your sanctuary.

Terms of Service

Privacy Policy

Core Modal Title

Sorry, no results found

You Might Find These Articles Interesting

T
Please Check Your Email
We Will Be Following Up Shortly
*
*
*