Add Row
Add Element
cropper
update
AI Ranking by AIWebForce.com
cropper
update
Add Element
  • Home
  • Categories
    • Marketing Evolution
    • Future-Ready Business
    • Tech Horizons
    • Growth Mindset
    • 2025 Playbook
    • Wellness Amplified
    • Companies to Watch
    • Getting Started With AI Content Marketing
    • Leading Edge AI
    • Roofing Contractors
    • Making a Difference
    • Chiropractor
    • AIWebForce RSS
  • AI Training & Services
    • Three Strategies for Using AI
    • Get Your Site Featured
May 13.2025
3 Minutes Read

Create Stunning Textured Plaster Wall Art Panels in Easy Steps

Modern textured plaster wall art in cozy living room setting

Unleashing Creativity: The Joy of DIY Plaster Wall Art

Transforming your living space doesn't have to involve hiring a designer or spending a fortune on store-bought decor. With textured plaster wall art panels, you can add a unique flair to any room while engaging in a rewarding DIY project. This delightful craft not only enhances aesthetic appeal but also provides a therapeutic outlet for creativity, promoting a sense of accomplishment and personal satisfaction.

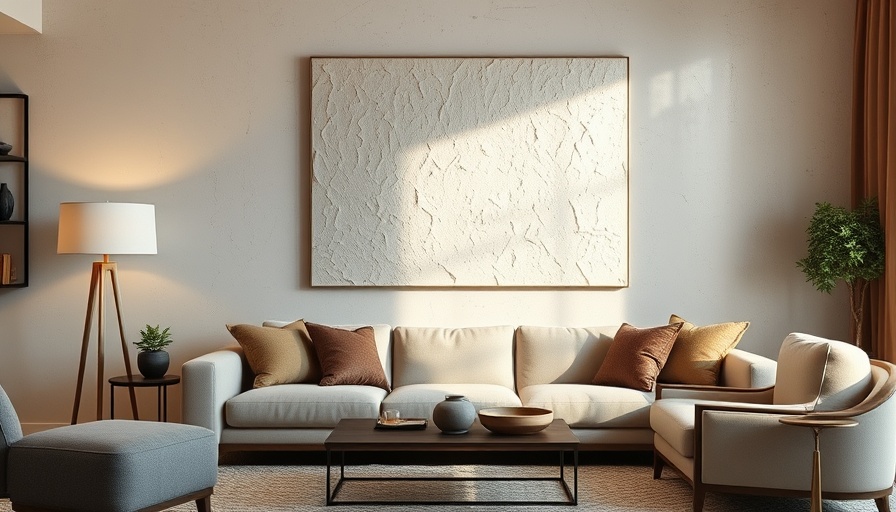
Understanding the Texture: Why Plaster?

Plaster serves as a versatile medium that offers depth and character to wall art. Unlike paint or traditional canvas, plaster can be molded and shaped to create striking three-dimensional effects. It captures light differently and provides a tactile experience that is often lost in more conventional artworks. This tactile quality can evoke emotional connections, making plaster art particularly special.

Getting Started: Tools and Materials You’ll Need

Before diving headfirst into your project, it's essential to gather your materials. Basic tools such as a hair dryer, hot glue gun, and a small hammer will serve you well. While your expenses can range from $15 to $80 depending on your choices, investing in these materials opens up a new world of creativity. Imagine creating stunning wall art panels using just plywood, plaster, and a few basic tools, all while spending quality time at home.

The Step-by-Step Journey to Create Your Artwork

Creating textured plaster wall art panels is an art that evolves with practice. The journey begins with cutting the fiberglass window screen, which serves as a base for your textures. The process of stapling the screen and folding it to create undulations is both satisfying and crucial in producing an eye-catching effect. Each step allows you to experiment with shapes and designs, ensuring your art is truly one-of-a-kind.

Embracing Mistakes: The Beauty of Imperfection

One of the most enriching aspects of creating with plaster is the room it allows for imperfection. Mistakes can often lead to unexpected beauty; perhaps a fold wasn’t positioned quite right or the plaster dried unevenly. Instead of viewing these moments as failures, embrace them. Each error adds character and a story to your artwork, transforming it into a cherished home decor piece.

The Therapeutic Benefits of DIY Art Projects

Engaging in hands-on projects like plaster wall art doesn’t just beautify your home; it promotes mental wellness too. Crafting allows for a form of expression that can alleviate stress and anxiety, often acting as a form of therapy. As you mold the plaster and create textures, you can find mindfulness in the process, helping to focus the mind away from daily pressures.

The Final Touch: Personalizing Your Creation

Once your panels are crafted and set, it’s time to infuse them with personal meaning. Applying gesso paints, experimenting with colors, or adding different finishes can reflect your style or memory. This personalization not only enhances the visual appeal but also embeds sentiment into your art, making it much more than just decor; it's a signature of your creative journey.

A Call to Creativity: Start Your Plaster Art Journey Today!

Ready to transform a blank wall into a captivating work of art? Gather your tools and materials and embark on this journey of creativity. You’ll discover not only the joy of making but also a deeper connection to your living space. Dive into plaster wall art and let your imagination guide you!

Home Now and Future

0 Comments

Write A Comment

*
*
Related Posts All Posts
12.12.2025

Unexpected Hyundai Recall: Why Silver Vehicles Face Safety Issues

Update Unusual Reasons Behind Hyundai's Silver Vehicle Recall In a rare twist for car recalls, Hyundai is taking action focused not just on mechanical issues but on the color of their vehicles. Nearly 500 Hyundai automobiles, specifically silver models of the Genesis G90 from 2023 to 2026, face a recall due to visibility concerns linked to the paint finishing. This raises questions about how much color can impact vehicle safety and how manufacturers are addressing such unique challenges. Understanding the Impact of Color on Vehicle Safety Color might not seem like an issue worthy of a recall, yet it's significant in automotive design and safety. The problem arises with how the reflective properties of the silver paint can mislead the vehicle’s radar system intended for automatic braking. According to the National Highway Traffic Safety Administration (NHTSA), the aluminum content in the paint can cause radar signals to bounce incorrectly, leading to what is termed 'sudden, unintended braking.' This anomaly not only highlights a complexity in automotive technology but also emphasizes the importance of visibility in road safety. What Models Are Affected? The recall impacts nearly 500 vehicles, specifically: the 2023, 2024, 2025, and 2026 models of the Genesis G90. Interestingly, this recall is specific about the paint color used, meaning other colors like black or blue are not affected. Owners of silver models are advised to be vigilant, with Hyundai set to send out notifications starting January 2026. If you're concerned your vehicle adds up to the recall list, checking via your Vehicle Identification Number (VIN) on the NHTSA site can offer clarity. What Steps is Hyundai Taking? Hyundai is committed to resolving this unusual recall. Owners affected can expect dealers to replace the front bumper beam at no extra cost. Furthermore, Hyundai advises customers to refrain from using the Highway Drive Assist feature until the repairs are made, demonstrating a proactive approach toward safety. Future Implications in the Automotive Industry This unusual issue might redefine how vehicle manufacturers assess paint colors and their impact on safety technology. As cars become increasingly reliant on technology for features like automatic braking, it will be interesting to see if other manufacturers follow suit and reassess their color choices as well as their application. A deeper understanding of the interplay between vehicle design and safety technology will be essential moving forward. Conclusion: Staying Informed for Safety With Hyundai’s latest silver vehicle recall, car owners are reminded of the importance of staying informed about vehicle safety and recalls. It's crucial to be engaged actively in car maintenance and safety checks, establishing a community of informed consumers.

12.12.2025

Unlock the Secret to Splitting Wood Safely with an Axe

Update Mastering the Art of Splitting Wood Safely Splitting wood with an axe is not only an invaluable skill for DIY enthusiasts and campers, but it also provides a great workout while supplying essential firewood for colder months. As autumn approaches and outdoor activities become more prevalent, understanding the nuances of how to split wood safely and efficiently becomes paramount. Here’s your guide to mastering this timeless craft. Safety First: What You Need to Know When wielding an axe, safety should always be your top priority. Prior to picking up the axe, take the necessary precautions. Always wear protective gear, including safety glasses to shield your eyes from flying debris, and gloves that provide a firm grip. Footwear with a safety toe is advisable to keep your feet safe from accidental drops. It’s best practice to have a buddy nearby; not only for assistance, but for safety in case of any accidents that may occur. Choosing the Perfect Axe: Finding Your Fit The type of axe you use significantly impacts your ability to split wood efficiently. Generally, a splitting axe or maul will be more effective for larger, tougher logs, while a standard axe is appropriate for smaller pieces. As outlined in the Art of Manliness, understanding the distinction is crucial—remember that you’re not cutting or chopping wood; you’re splitting it. A sharp axe is essential: if the axe bounces off the wood, it’s time for sharpening. Planning Your Strike: Positioning Matters Where and how you place the wood for splitting is not just a matter of technique—it’s a crucial safety factor. For starters, use a sturdy chopping block and position your wood so that it is on the far side of the block. This will ensure that, if you miss your target with the axe, it has room to land safely rather than risking an injury. As you prepare to strike, always line the axe up with the grain of the wood to facilitate an easier split. Techniques that Work: Effective Methods to Split Wood There are various techniques for splitting wood beyond simply swinging your axe. The Family Handyman outlines several recommended approaches: Over-Log Splitting: For larger logs, place them on a solid log and strike down with your axe positioned at an angle for optimal force. Baton Technique: For particularly tough or knotty wood, use a baton to help drive the axe down into the wood, ensuring control and precision. Hand-Splitting: Kneeling and directly splitting a small piece of wood on the ground can be effective; ensure the axe is embedded securely before striking. By mastering these techniques, you can split firewood quickly and safely, making the task not only productive but enjoyable. Final Thoughts: The Satisfying Reward of Splitting Wood Splitting wood by hand is rewarding in more ways than one. Not only does it equip you with a necessary skill, but it also provides the satisfaction of knowing you've prepared your own firewood. So, gather those logs, embrace the rhythm of your swings, and enjoy the satisfying crack of timber yielding to your efforts. If you’re eager to continue improving your outdoor skills, seek out more resources and tips to ensure you remain safe and effective when working with axes.

12.11.2025

Smart Strategies for Storing Bulk Toilet Paper: What You Need to Know

Update Is Bulk Toilet Paper Storage a Smart Choice? Considering the unexpected shortages faced during the COVID-19 pandemic, many have turned to stockpiling essential goods like toilet paper. While this offers a sense of security, it raises critical questions about how to store such bulk purchases. Is it safe? Does it really last? Understanding Toilet Paper Longevity Interestingly, toilet paper doesn’t technically expire. House cleaning expert Petya Holevich asserts, "Toilet paper doesn’t 'expire' in the way food does, but it can degrade over time." This degradation usually manifests as brittleness, discoloration, or a loss of softness, particularly when stored in unfavorable conditions. Plumbing supervisor Megan Doser adds that properly stored toilet paper can last for years without significant changes. The key is to avoid humidity, which can result in musty odors and even attract pests. Thus, proper storage is crucial for maintaining the quality of your bulk toilet paper. Best Practices for Storing Bulk Toilet Paper Once you’ve purchased your bulk supply, how do you ensure it remains usable? The first step is to find a dry, enclosed space where you can keep your rolls off the ground. According to cleaning expert Neel Parekh, cotton paper is susceptible to becoming "funky" without proper care. Here are some effective storage solutions: Cool, Dry Locations: Search for spaces in your home that are well-ventilated but not prone to humidity, like linen closets or under beds. Use Containers: Keep your rolls stored in containers or bins to facilitate organization and protection from dust and pests. Label and Organize: If you stockpile various brands or types of toilet paper, consider labeling your storage bins for easy identification. Ultimately, where you store your toilet paper can make a significant difference. Avoid places like attics or basements unless you have them waterproofed, as moisture can lead to deterioration. The Environmental Angle: Alternatives to Bulk Storage Considering sustainability, experts are increasingly recommending alternatives to traditional toilet paper, such as bidets. These not only reduce reliance on toilet paper but also promote better hygiene. "Since installing a bidet, I’ve reduced my toilet paper usage significantly," shares one household advocate. Eco-friendly brands like Reel Paper offer sustainable toilet paper options made from bamboo. Such choices minimize environmental impact and promote responsible consumption. The Value of Being Prepared Understanding how to store bulk toilet paper effectively is essential for maintaining its quality and ensuring you avoid waste. With proper storage solutions, you can provide your family with the necessities while also being mindful of sustainability. By following these recommendations, you can enjoy the convenience of having a bulk supply at your fingertips without compromising on quality. So, whether you choose traditional rolls or eco-friendly alternatives, make informed decisions that fit your home's needs. For anyone still considering their options, now is a good time to explore innovative solutions and make sustainability part of your home routine.

Terms of Service

Privacy Policy

Core Modal Title

Sorry, no results found

You Might Find These Articles Interesting

T
Please Check Your Email
We Will Be Following Up Shortly
*
*
*